

- Backlinks Explained: Why Your Backlinks Aren’t Paying Off - April 10, 2024
- Boost Your Agency’s Credibility: A Guide to Online Reputation - April 10, 2024
- URL Slugs for SEO: A Comprehensive Guide - April 10, 2024
Setting your preferred domain is a simple SEO tip that every website owner should know, and every SEO should know how to do. Following this simple tip can even double the power of your link building efforts. However, not following this SEO tip could cut those efforts in half.
3 reasons why you should set your preferred domain:
1. The Panda Update
A large reason for the Panda update was for Google to rid their search results of duplicate content. Google sees YourDomain.com and www.YourDomain.com as two different web pages. This could be perceived as duplicate content. So setting your preferred domain (www or no www) will let Google know which domain they should crawl and index.
2. Double the Power of your Backlinks
If Google thinks the www and non www version of a web page are different pages, then there is a strong possibility that being inconsistent with the preferred domain you build links to could hurt your link building efforts.
“…if you specify your preferred domain as http://www.example.com and we find a link to your site that is formatted as http://example.com, we follow that link as http://www.example.com instead.”
~ Google on Preferred domain (www or non-www)
For example, let’s say your preferred domain is not set, and half the time you link to www.YourDomain.com and the other half you link to YourDomain.com. There is a strong possibility that Google may think you’re linking to two different web pages, therefore cutting your link building efforts in half. Why take that chance? Now, Google does try to canonicalize matching domains, but they don’t guarantee it, as Matt Cutts’ explains below.
3. Personal Preference
I don’t know about you but I always set my preferred domain to no www. In my opinion, why say www if you don’t have to? www doesn’t roll off the tongue very well. In fact, many people just say dub, dub dub. So I don’t think I’m alone here.
How to Set Your Preferred Domain in 2 Easy Steps
Step 1. 301 Redirect
Open up your .htaccess file and add the following code. Don’t forget to change YourDomain.com to your actual domain.
If you prefer no www like me then add this:
RewriteEngine On
RewriteCond %{HTTP_HOST} ^www.YourDomain.com$ [NC]
RewriteRule ^(.*)$ http://YourDomain.com/$1 [R=301,L]
If you prefer to use www then add this:
RewriteEngine On
RewriteCond %{HTTP_HOST} !^(.*)\.YourDomain\.com$ [NC]
RewriteRule ^(.*)$ http://www.YourDomain.com/$1 [R=301,L]
Step 2. Set Your Webmaster tools
Open up your webmaster tools and click “Settings” right below “Configuration”. To the right look for the “Preferred Domain” and select which domain you prefer. Make sure it’s consistent with your preference in step 1.
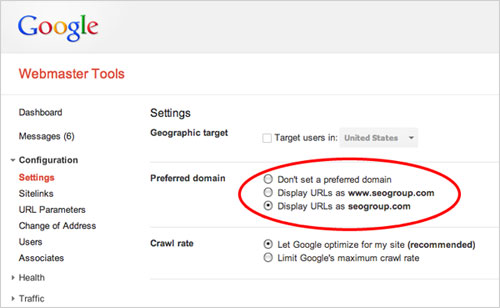
If you get an error, chances are you need to verify that you own both www and non www versions of your site (silly right?). To verify, simply add the other version of your site (www or non www) to webmaster tools and verify. Tip: try using the same verification code that you used to verify your first domain. That way you’re just one click from verification.
Want more? Too bad that’s all there is to it. If I left something out, scream at me below.
