

- Backlinks Explained: Why Your Backlinks Aren’t Paying Off - April 10, 2024
- Boost Your Agency’s Credibility: A Guide to Online Reputation - April 10, 2024
- URL Slugs for SEO: A Comprehensive Guide - April 10, 2024
I was inspired to write this article after a recent redesign and domain change for a client. For most site owners, a domain change can be a scary endeavor if the proper precautions aren’t taken. But if executed properly, a site can experience little to no change in rankings. Keep these steps in mind next time you’re considering a domain change.
1. Purchase Your Domain & Set Up a Basic Splash Page
Congratulations! You decided to purchase a new domain. This one is bigger and better than your current domain and it’s going to be a big hit for your visitors. For the sake of this example, we’ll say that you purchased BadgersAreTheBest.com (I have to represent my alma mater!) Once you’ve purchased the new domain, have your developer create a basic splash page that lets people know a new site is coming soon. There are a lot of templates out there that are pretty snazzy and can help grow the excitement for the new site, like this one from Awake.

2. Create a Sitemap/Page List for Both Domains
Develop a sitemap or page list for both domains so that you can map out your redirects. I prefer using excel because it’s easier to keep things organized, especially if you have a large site.
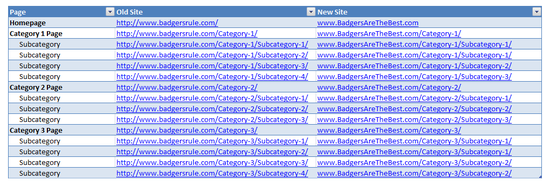
Redirecting all visitors to a homepage is not ideal. Make sure you redirect visitors to the most applicable page on the new domain, where they’ll be able to access similar information.
Here is an example of how I like to map out URLs.
3. Create a Few Pages On the New Domain and Test 301 Redirects
It’s important not to transfer your site to the new domain all at once. Doing the transfer in bits and pieces will help you identify any issues with the redirect implementation, domain “penalties” due to spamming from the previous owner, etc.
Warning signs would be:
√ A dramatic drop in rankings
√ Not seeing the redirect when you type in the old URL
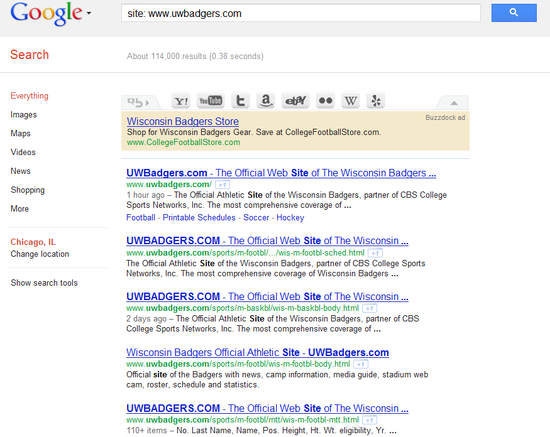
√ Not seeing any pages after doing a site: www.BadgersAreTheBest.com search in Google (this will require some time as the search engines need to crawl and index the new pages). Doing a site: www.yourdomain.com search will list all the pages on the site that Google has indexed.
A site search for UWBadgers.com shows the following:
4. Create Remaining Pages and Transfer Content
When you’re ready, have your developer create the remaining pages on the site and transfer the content. Remember not to push the pages live until you have successfully completed all your redirects in the next step!
5. Complete 301 Redirects
After you’re confident with the test redirects you implemented, complete the remaining 301s. If you have a large site or just don’t feel like typing out each 301 redirect, I highly recommend using Excel’s =CONCATENATE formula. I created a basic table in Excel that outlines the command, old URL, new URL, and the final redirect (where the formula goes).
Then I used this formula to get the desired redirect.
=CONCATENATE(A1,” ”,B1,” ”,C1)
Replace A1, B1, and C1 with the appropriate cell. Remember to include ,” “, in the formula so that you get spaces in the final product.

REMEMBER to redirect all of the URLs for the homepage, including /index, /home, etc.
6. Use the Same Google Analytics Tracking Code on the New Site
Many site owners may be lead to believe that you need a new Analytics account number when you’re changing your domain. I do not recommend starting a new account AT ALL. Simply place the old code on all the pages of your new site that you want to track and make an annotation in Analytics noting the domain change. That way, you’ll be able to compare old and new data within the same account. This is especially helpful when determining the effects of a redesign.
7. Register Your Old Domain & New Domain With Google Webmaster Tools & Use Change of Address Tool
If you haven’t already, both your new and old domains should be registered with Google and Bing Webmaster Tools. You will have to complete a simple verification step that your developer can help you out with.
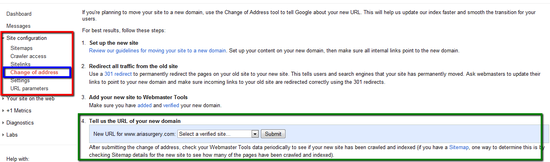
Here are your following options from Google Webmaster Tools:
√ Add a specified meta tag to your homepage
√ Upload an HTML file with the name you specify to your server
√ Add a DNS TXT Record Add the Google Analytics code on your site (you must use the asynchronous code and be the administrator on the account)
Don’t forget to use Google Webmaster Tools Change of Address Tool to notify Google that your site has moved.
8. Submit Sitemaps for Both Domains
By submitting sitemaps for both the new and old domains, search engines can see the relationship between the two sites and identify the 301 redirects in an effort to index the changes quicker. If you’re not familiar with creating a sitemap, reference Google Webmaster Tools help article on the topic. The article is extremely helpful and outlines definitions, formats, guidelines, etc.
9. Update Only the Important Backward Links
One of the most concerning aspects of a domain change is what to do with all the links you’ve accumulated on the old domain. It is unreasonable to contact every site that links to you and request that they change the URL. Only contact the most authoritative sites that link to you or those that you have a relationship with. Keep in mind though that engines WILL carry any link “juice” from the original page to the new URL via the redirects. So don’t worry, your links are covered!
10. Leave the Old Site Up for a Few Months
Everyone may not know that your site has moved, so it’s in your best interest to keep the old site up for at least 90 days to prevent confusion. After a few months, the new domain will have circulated enough for people to be aware the site has moved.
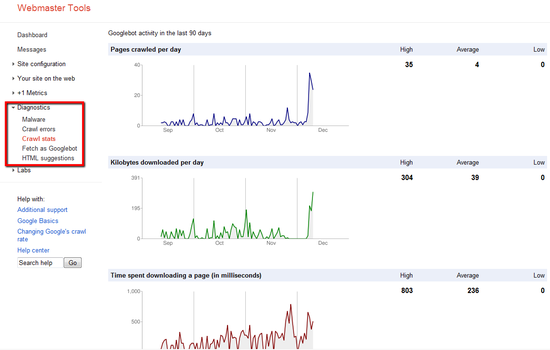
11. Monitor Errors in the Diagnostics Section of Google Webmaster Tools
Google Webmaster Tools is one of the most amazing resources a site owner could ever have. You can monitor crawl errors, crawl stats, and even HTML suggestions regarding duplicate or non-existing meta data. For domain changes, pay particular attention to the crawl errors and stats in this section. You’ll be able to identify issues Google is having while crawling and indexing your site and the specific errors associated with them.
12. Remember to Keep All Your Log-Ins Handy
One of the biggest challenges I face with clients is hunting down log in credentials for accounts. If you need to make changes or monitor errors on your new domain keep the following log-ins on hand so you can easily access information.
√ Google Analytics Log-In
√ CMS Log-In
√ Hosting Account Information
√FTP Information
√ Domain Registrar Account Information
By following these 12 steps you can successfully complete a domain change without sacrificing rankings. But don’t be alarmed if you do experience a slight drop-off in the beginning. This is to be expected as the search engines start understanding the relationship between the two sites. Continue to monitor your rankings, traffic, and other site stats via Webmaster Tools and Analytics until you’ve seen the data level out.